A lot can go wrong if Toe in is not right. Here's some pointers and a "no strings attached" method to measure/adjust toe in accurately.
I have been chasing down a right wheel well clearance problem which partly turns out to be a Toe in issue. The correct Toe In should be 2mm to 4mm
with the front of the wheel rim closer than the rear of the wheel rim. Mine was set in the opposite direction by over 6mm -- a Toe out
What Toe out does while driving in the forward direction is put outward force on the two front tires resulting in negative camber causing the front-end
to squat down, thus, at least in part, my clearance problem. There is also some inside Tire edge wear, and harder steering than should be.
Fixed this today, I now have a positive camber, run 1.5" to 2" higher, and I was surprised how much easier it is to steer.
Thanks to Jim LaGuardia for several pointers on how to measure Toe in, and the trick to see if your neg. or pos. This was simple. Run forward 10'
on flat ground; measure the clearance to ground from a reference point on the front of your Pinz, reverse 10' re-measure. If you find in the reverse
direction increased height then your toe in is in the WRONG direction. This may not happen but you could have too much Toe in. You can get a
good idea where you are with a tape measure, measuring front and back distances across the front tire rims as below -- go through the yoke hole
to keep the tape straight.
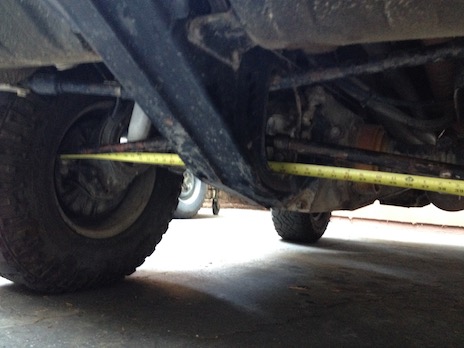
- Tapemeasure.jpg (43.07 KiB) Viewed 4490 times
When I did this it was clear I was way off and in the wrong direction.
To adjust Toe in properly you need to reference the front wheel to the corresponding rear wheel. Many people do this by running a taught string
parallel to the center of the wheels at a fixed distance from each hub (many Youtubes on this). This approach is prone to error. What I have come
up with is a way to to the reference more accurately using a Laser level. You need a Laser level (any one should do), a 12" piece of 1"x3" (or 4")
Aluminum U stock, and 4 plastic 12" x 16" cutting boards (Walmart, or Target). Cut clearance for the lug nuts, you won't need to remove the hub
steps. Picture below shows LAser and mounting bracket, bean is hitting a "reference" point.
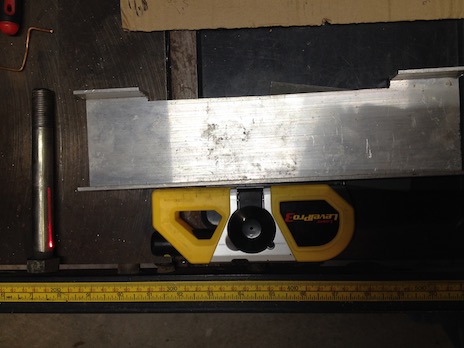
- LaserMount.jpg (44.74 KiB) Viewed 4490 times
Next you need to get your front end on Toe In slip plates. The wheels need to rotate reasonably freely and not have a lot of ground friction
which will throw off your adjustments. The trick here is you cannot jack up your front as then you will have a lot of artificial camber which is
not natural. Place a pair of cutting boards on a sheet of plywood, put a little Oil on the inner surfaces, box them in with strapping on the edges
to temporarily hold them in place while you drive on the cutting boards. Remove strapping -- your all set with Toe in slip plates.

- slip-plates.jpg (52.05 KiB) Viewed 4490 times
Next position the Laser finder and mounting bracket. To the inner wheel, keep it flat. Measure the distance from the rim to the hot point of the Laser,
mine was 78mm. Place a piece of anything off the rear rim e.g. cardboard, and measure that to the reference height (e.g. 78mm in my case), mark
that. You will also need a 2'nd mark further out for the amount of Toe in desired -- discussed next.
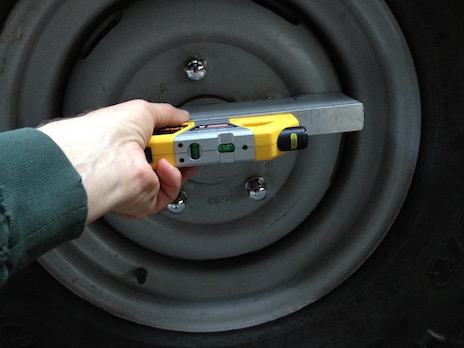
- Laser-reference.jpg (39.39 KiB) Viewed 4490 times
The amount of desired Toe in is a little simple math. Toe in is 2mm to 4mm, or from the center of the wheel to the rim is 1/2 that or 1mm to 2mm.
The rim to rim length is 438.15mm or a radius of 219.075mm. The distance from the center of the front wheel to the rear rim edge is 1981.2mm.
Doing the math the additional distance beyond the reference length at the rear rim is 9mm to 18mm, in my case this was 78+9 to 78+18. This was
dead accurate -- no strings attached. It was also very fast to do.