Intro from Malaysia - WR7002 - C304

Volvo TGB and 30X (303/304/306) mods and resto work, news, resources and non-technical stuff
geckoadventure
New Zealand
Posts: 481
Joined: Sat Aug 21, 2010 8:48 pm
Location: Malaysia
Contact:

Re: Intro from Malaysia - WR7002 - C304

Post by geckoadventure »

11 February 2017

Strip the volvo brake lines out then down to the parts shop for Toyota and Volvo hoses and the hydarulic shop for new pipe and fittings. $550rm is emptied from my wallet.

3pm back in the workshop after 4 hours/away I get the Rear brake lines done but I have to go steel pipe brake to brake as the flexible hoses are not the right length so we will get more monday and fix up the issue. Meantime I finish the piping to the master cylinder for the rear brakes and will sort out a longer flexi hose next week.
Image

12 February 2017 - Sunday

Fit the clutch slave cylinder and lay the piping out till I run out of pipe as I cannot find the 2 spare 5 foot lengths I saw in the workshop Friday.

Cut the panel under the passenger seat in the wheel well to give access to the injector pump etc.

Fit the drivers floor.
Image

Cut out the 2 sidelights fill panels as the new sidelights from Volvo are much bigger and need new mounting

points created.
Image

Image
geckoadventure
New Zealand
Posts: 481
Joined: Sat Aug 21, 2010 8:48 pm
Location: Malaysia
Contact:

Re: Intro from Malaysia - WR7002 - C304

Post by geckoadventure »

16 February 2017

Work on the steering disassemble and reassemble the steering column parts so the worm screw works properly.

Rebolt it all in and the brahe booster yet again.. Chasing parts etc and the day is gone.

17 February 2017

Work on the steering again bolt in the top half of the steering and it all fits nicely.
Image
geckoadventure
New Zealand
Posts: 481
Joined: Sat Aug 21, 2010 8:48 pm
Location: Malaysia
Contact:

Re: Intro from Malaysia - WR7002 - C304

Post by geckoadventure »

3 March 2017

Drop into friends workshop to get the alloy watertank remade into stainless steel. There is his immactulately finished PINZ. In the shop is my friends PINZ all the light grey panels are new and designed in-house. They look so factory that he has more pinz's lined up after to have the same operation done.
Image

Image

4 March 2017

Day Trip to the Volvo I was going to drive quietly since the Isuzu'as rear tires started sliding out during the week in the rain. However, it's dry so I sit on 140k instead. Work continues on brake lines they are getting so close to being finished. We order the new hydraulic cylinder for the power assist steering. 2 weeks and can collect. Then it's an emergency run down to the tire shop for 2 new rear tires for the trusty ISUZU.

Image

Image

Back to Kuala Lumpur in the evening as tomorrow it's my birthday and I have 4x4 driver training to run. It's a much safer 190k run back home with the new Michellin sneakers on it.

Mr Brown throws a sad when I leave.
Image
geckoadventure
New Zealand
Posts: 481
Joined: Sat Aug 21, 2010 8:48 pm
Location: Malaysia
Contact:

Re: Intro from Malaysia - WR7002 - C304

Post by geckoadventure »

10 March 2017

Get to Ipoh and realise no Fone however, the workshop is opened for me. Work on the brakes and clutch piping all finished except I miss getting the last pipe correctd as they have moved the mounting brackets 30mm and there is no more strech left as the hydraulic shop closed 5 minutes ago sob.

11 March 2017

The workshop is locked cannot get in. Damn the wrong message was conveyed to the workers and I cannot ring them. So I head home to KL a days work lost.
geckoadventure
New Zealand
Posts: 481
Joined: Sat Aug 21, 2010 8:48 pm
Location: Malaysia
Contact:

Re: Intro from Malaysia - WR7002 - C304

Post by geckoadventure »

18 March 2017

My last full weekend on the Volvo until after June as I have 14 kids from the orphanage to teach kayaking on Sundays until their 5 days kayaking adventure with me in June.

Inspection shows

Front mudflaps mounting points bolted on.
Image

Steering arm has been shorted 40mm resulting in reduction of steering turns from 2.25 to 1.5 making it nicer to drive.
Image

Rear electrics panel is almost completed.
Image

Image

I finish the rear piping and all the way to the front and sheath the piping under the dash.
Image

I grind down the front holding nuts 3mm to make the joining nut on the pipe to flexi hose tighten up and the front brakes are then completed and make the firewall to the master cylinder piping up.
Image

Right rear mudflap mount
Image

and left
Image

Power steering assist cylinder collected. Before you ask yes its equal pressure both ways even though it looks single action. It will be mounted to the DIFF next week.
Image

The hydraulic shops beginnings was for the tin mining industry in IPOH.
Image

The brake and clutch piping all protected, holding brackets will be made next weekend
Image

I finish the rear piping and all the way to the front and sheath the piping under the dash.

Clutch pipe is relayed as one piece from slave cylinder to firewall

Wahoo they are all finished and tightened down.

Knock off time

19 March 2017

9:10am damn the gates been locked I cannot get in. I give up and go home at 10.00am. Another day lost.
THE 109
Posts: 9
Joined: Sun Nov 28, 2010 1:20 am
Location: Gold Coast,Australia

Re: Intro from Malaysia - WR7002 - C304

Post by THE 109 »

Hi Dave,

Could you show us what was done to convert the brakes to discs?

Was there any welding done to the lower axle shaft or was it just machined down to slip the disc over?

Also what model vehicle are those wheels off? (they seem to be the wheel of choice the comp guys over there.)

Thanks,
Eric
geckoadventure
New Zealand
Posts: 481
Joined: Sat Aug 21, 2010 8:48 pm
Location: Malaysia
Contact:

Re: Intro from Malaysia - WR7002 - C304

Post by geckoadventure »

22 May 2017

Well it's been 8 weeks at least since I last saw the Volvo. After being off work sick for 6 weeks with a stomach virus from something I ate and now training the orphanage kids for the August Kayak adventure I took a day off work to visit it for progress.

Meantime in the 7 weeks I have obtained new front windows cutoms made and cut for the wonderful price of 40USD a pair for 9.7mm laminated autoglass oh and I left it at home damn curses. I have new LED headlights. The new stainless steel water is still being made.

So whats been done.
- Powersteering is almost completed
- Rear 12v power panel is completed no pics as the Volvo is way up on the hoist.

They collected the power steering parts from the engineering shop and I fitted then to the power steering cylinder. Went down to the hydraulic shop cut the hoses to length and got new ends fitted. Then connected the power steering hoses to the new cylinder. New holding brackets for the left and right hoses made and mounted. Could not fit the top power steering hoses as the Volvo is way up on the hoist. But next visit I will have it done.

Mr Brown was so happy to see me he decided to help me on the workbench while I chopped 10mm off the mounting bolts.
Image

Finally it was all bolted down. We may have to change the design of this does not work.
Image

Discussion on the switch rollcall we have 5 to buy to have them able to complete the front switch panel.
Then it was time to test out the new LED headlights. Ooooh they are cool. Bonus they have sidelights and indicators built into them.
Image

So now we can weld in the inserts I made and touch them up with paint etc.
Image

Image

A few things left to do:
- Air conditioning
- Assemble doors
- Build new Drivers dash panel
- Wipers build and fit
- Connect remaining switch panel wires
- PTO find switchs and refit
- Test everything
geckoadventure
New Zealand
Posts: 481
Joined: Sat Aug 21, 2010 8:48 pm
Location: Malaysia
Contact:

Re: Intro from Malaysia - WR7002 - C304

Post by geckoadventure »

9 June 2017

Took the week off to take 17 orphanage kids on a 4 day intensive kayaking training camp. Then had the Friday to myself. So a visit to the Volvo was in order. 5:5am Leave KL with young Joe from the orphanage with me . 7.30am in IPoh for breakfast and 8.15am at the workshop.


So whats been done.
- Powersteering is almost completed - still have resivior to mount
- Bull bar was bolted down but not correct so I have this to fix today.
- Rear floor has been bolted down
- Covers are being made for the inside of the door locks.
- The side bars on the bumper have been remodelled to protect the underneath of the cabin door frame.

Image

Image

Then we moved onto the power steering resivior - cut hoses ready to bolt it in. Damn the braket is imperial bolts 6mm will not fit. We need to go to the bolt shop later.

Cut and fit the brake booster vaccum hose.

Then we found the engine mounts we had missed bolting down the underside of the engine mount locking washer. So we made 2 8mm washers from steel and bolted them in - 1 hour gone

Connected up a missed brake pipe part.

Then it was time for a test fit of the glass we had so happily brought from KL.

Great dissappointment they did not fit. Turns out some idiot made them bigger than the exact tenmplates we supplied. Quality was terrible. They were returned to the glass factory much tot he anger of the big chinese shop manager who looked like he wanted to string the cheap bangaldeshi labourer up when he explained how he made the windows.
Image

Then Joe tried out the hammock setup and gave it the thumbs up.
Image

Oh we missed getting to the bolt shop.

Soon it was hometime and the end of a very unsuccessful day and Mr Brown decided to get friendly with Joe by holding his hand with his teeth.
Image

Final view of the Volvo before I see it in a couple of weeks.
Image

Image


Image

So whats left
- Doors assemble and bolt on
- Air COnd to do
- Dash wiring
- Switch Panel to be cut out
- Power steering final connection
- Fix the loose rubber hose we found under the engine
- Window wipers buy and fit
- PTO Switches find and install
- GEar lever hole repair
- Windows fit.
User avatar
Jimm391730
United States of America
Posts: 1456
Joined: Wed Apr 14, 2004 10:58 pm
Location: Idyllwild, CA

Re: Intro from Malaysia - WR7002 - C304

Post by Jimm391730 »

Awesome! Progress is always wonderful! Can't wait to hear that it is completed; won't be long now!
Jim M.
712W and 710M
geckoadventure
New Zealand
Posts: 481
Joined: Sat Aug 21, 2010 8:48 pm
Location: Malaysia
Contact:

Re: Intro from Malaysia - WR7002 - C304

Post by geckoadventure »

Jimm391730 wrote:Awesome! Progress is always wonderful! Can't wait to hear that it is completed; won't be long now!
Neither can my wife. I'm being nagged to death to complete it.
stiffler4444
Canada
Posts: 776
Joined: Mon Mar 15, 2010 1:46 pm
Location: Crystal Beach ON CAN

Re: Intro from Malaysia - WR7002 - C304

Post by stiffler4444 »

Looking a lot like a near complete truck now. Congrats! Those LED's look awesome by the way..... :D
1972 710m
geckoadventure
New Zealand
Posts: 481
Joined: Sat Aug 21, 2010 8:48 pm
Location: Malaysia
Contact:

Re: Intro from Malaysia - WR7002 - C304

Post by geckoadventure »

26 June 2017


Public holiday Parts run after spending the 2 previous Saturdays chasing parts . Compressor, ARB pressure switch, drop seats off to cushion shop, return glass to glass shop to remake as they really screwed it up.

Recce for corporate team building etc and of course the Sunday kayaking training for the orphanage.

Saturday 24 June was teaching a kid from the orphanage the basics of welding - trying to show these kids career opportunities.

So they sent me a pic of the switch panel. It's a go cut the new one out.

Meantime in my spare time I have been drawing up the rollout drawer stuff (cooker plate and hidden tables) free-hand ready to get to the bending engineer to do his magic laser cuttting and bending stuff. I only need to repurchase 2 M8 internal diameter bearings so we can do the final measurements needed for the 60+ bearings needed to make it roll out/in smoothly.

Switch panel is layed out they are laser cutting the new one out now.
Image

The cushion shop sent me the pic of the seats they are ready. They look ace with material instead of the sweat causing PU. However, they are closed for Raya holidays so I can only collect this coming Wednesday.
Image

So welding lessons for the kid and I slowly get the racks for the military box storage at home completed.
Image

Collected the speaker panels and the overhead console. They did not bend the speaker panels sigh - have to do that in IPOH next time.

Then we attacked the overhead console - Oh Crap there is a design issue and the first weld splits the 5052 alloy - sigh back to the drawing board and redesign to make less pieces. There goes 600rm of 5052 alloy rats.
Image

The speaker panels I need to spend time sanding them ready to mark and bend then they can be undercoated and painted the desert storm colour with maybe a blue sheet behind the gecko to highlight it.
Image

Then finally 26 June 2017 a late arvo 2 hour run to IPOH 190k away to drop off the glass, COmpressor and pressure switch so they get it all fitted.

Well the 2 hour trip turns into 4 hours the traffic and the accidents. We test fit the glass after they delivered it to my house after the mouthful I gave them after returning the first attempt back to them - F**K they did not follow the perfect templates yet again and left the bottom corners of each window intact instead of trimming them off. It's ok the workshop will grind the insides of the window frame welds out.

Dinner then home time - another 4 hours goes by and I arrive home 1.30am exhausted. No idea when I will get to the workshop next maybe next sunday if I give the kids kayak training to someone else to run.
geckoadventure
New Zealand
Posts: 481
Joined: Sat Aug 21, 2010 8:48 pm
Location: Malaysia
Contact:

Re: Intro from Malaysia - WR7002 - C304

Post by geckoadventure »

8 July 2017

So early morning drive to IPOH 190k gone. Breakfast then down to the workshop. Hmmmmm not open So I go to the bearing shop instead. Now the workshop going to be is open so I head to the workshop after getting bolts for the bearings for the testing of the rollerdrawer design. I also drop the TURBO of my RED monster in for surgery to make it spool up faster since the RED monsters engine is getting a head overhaul due to pitted intake valves sigh and an overheating issue. IPOH has an excellent diesel performance tuning shop.

The progress is explained to me so I can carry on with my plan while they do the wiring in the next 2 weeks

Finish the doors and cockpit metal fabrication.

I hand over the new simple shocks I have purchased. They can be installed anytime not today.

I have the doors to panel up. The kneepads to remake and the speaker panels to prepare to bend and paint and bolt in.

The test bearings to get the measurements from for the roller drawers we will need 50-60 of these. Now I can finish the drawing ready to get CNC cut.
Image

First the newly covered new seats. They look cool and will not be as sweaty as the PU.
Image

Image

The mess I have to start with - a door and the really rusted knee pads from Volvo 2 as samples. My goal is to finish paper templates and then do the cutting. WHo needs a huge crew like overhauling I can do all this myself.
Image

Soon I have left door top panel done. The right well I prepared it and fited it but with 20mm left to slide in it will not budge. I need to knock out and do some trimming and and sanding with the flapper wheel. If the 5 bar plate proves to be too rough on the skin then I will replace with smooth panel. They are almost ready to get powder coated or anodized.
Image

Door templates done. I could not do the cutting as I had trouble getting the 84 sheet to stay steady by myself so have left the big chop for the shop to do for me.
Image

Next the afternoon killer the kneepads. Takes me several hours to get them cut out. The drivers side proving to be a pain to cut and will be a pain to fit due to the power steering and the new brake cylinder. I can make these out of 1.6mm steel next visit. Next is to find the sponge - im looking at kiddy playground floor sponge then I can shape it and cover them in Vinyl and fit.
Image

Speaker panels need sanding after the lazer cut has left a lot of slag. I have 3 spots to get a fine file in and cleanup then they are ready for bending. Alloy bending template left for the workshop to bend them.
Image

The front swithc panel is all cut out os stainless steel. I have requested it be cleaned up and clear coated. Connecting of the panel wiring and switches starts this week.
Image

Wiring diagram has been revisited and some 24v stuff converted to 12v including the air conditioning. Only the starter and the t-Max winch remain 24v.
Image

Service hatches have now been cut to allow generator and fuel pump access.
Image

Image

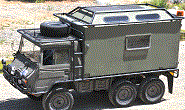
Final pic before I head off home. It hasn't changed much but quite a bit of work done.
Image

Home time for the long drive home. Sicne they have added new speed cameras in the past month I have slowed down a lot and happily sit on 110kph.

Plans for the rollout drawer and the 2 slide out tables - cooking and eating are almost complete soon can start the CNC drawings and the building of the drawers and tables in KL.
Image

Image
User avatar
VinceAtReal4x4s
Admin
United States of America
Posts: 2037
Joined: Mon Apr 12, 2004 10:36 pm
Location: Ca. or lost in South West USA
Contact:

Re: Intro from Malaysia - WR7002 - C304

Post by VinceAtReal4x4s »

Have you tested those seats for entry/exit yet? With your ride height those seat bolsters might be a real pain in the ass (pun intended). I had one at my place once with similar styled seats and it was a real problem after a few entries, and that was with a smaller tire than you are running. I think the owner got an upholstery shop to knock them down. At the least they will wear out fast.
"For those who risk, life has a flavor the protected shall never enjoy"

Your donation makes this site possible!

Image
geckoadventure
New Zealand
Posts: 481
Joined: Sat Aug 21, 2010 8:48 pm
Location: Malaysia
Contact:

Re: Intro from Malaysia - WR7002 - C304

Post by geckoadventure »

VinceAtReal4x4s wrote:Have you tested those seats for entry/exit yet? With your ride height those seat bolsters might be a real pain in the ass (pun intended). I had one at my place once with similar styled seats and it was a real problem after a few entries, and that was with a smaller tire than you are running. I think the owner got an upholstery shop to knock them down. At the least they will wear out fast.
Yes have tested them. they are ok. Also tried to get the cushion shop to knock the bolster down and they could not - they don't hasve that skill but they do a great job of upholstery.

We will see after a few days of usage how they go. The previous recaro's had a huge bolster on them and they were also hgigher up than these. These chairs are 3" lower at the seat.
Post Reply