

You should be able to power your timing light from either one of the trucks batteries.
However the way I do it is to use a small jumper battery as in this photo. You could use any 12 volt power source with adequate capacity to power the timing light. It really doesn’t need much.
By using an auxiliary power source I don’t have to drape power cables across the running engine.
Works the same way on the Pinz as on the bike the only connection required to the vehicle is the inductive pickup attached to the number one plug lead.
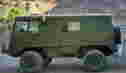
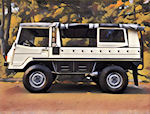
The Warn Pinzgauer
Re: The Warn Pinzgauer
- Attachments
-
- jump.jpg (39.86 KiB) Viewed 3326 times
Cum catapultae proscriptae erunt tum soli proscript catapultas habebunt.
Re: The Warn Pinzgauer
Thanks Ed, I will give that a try!
Wheel drive rebuild is in full effect. I just can't help myself, If it is old and filthy it needs to be re-newed!

my home made puller, worked great! Some plate from the scrap pile, some old head bolts and some nuts with washers. I will find many uses for this in the future!

sand blasted, cleaned and ready for paint

primer


alloy so I give it the aluminum paint


the cast gets....


Tomorrow, assembly begins
Cheers
Wheel drive rebuild is in full effect. I just can't help myself, If it is old and filthy it needs to be re-newed!
my home made puller, worked great! Some plate from the scrap pile, some old head bolts and some nuts with washers. I will find many uses for this in the future!
sand blasted, cleaned and ready for paint
primer
alloy so I give it the aluminum paint
the cast gets....
Tomorrow, assembly begins
Cheers
Last edited by Nomad on Tue Oct 08, 2013 3:09 am, edited 1 time in total.
-
TechMOGogy

- Posts: 2831
- Joined: Wed Feb 01, 2012 11:39 am
- Location: Ontario, Canada
Re: The Warn Pinzgauer
What did you use for the black paint - rattle can or ?
Can I sell you my Pinz, then I will buy it back but before I pick it up you can do all the work to it
Great thread and great photo doc
Can I sell you my Pinz, then I will buy it back but before I pick it up you can do all the work to it
Great thread and great photo doc
72 Pathfinder | 75 710M 2.7i | 96 350GDT Worker
Re: The Warn Pinzgauer
Haha, nah, I am not buying another Pinz. I will restore/fix up yours though. I am cheap!TechMOGogy wrote:What did you use for the black paint - rattle can or ?
Can I sell you my Pinz, then I will buy it back but before I pick it up you can do all the work to it
Great thread and great photo doc
I just rattle canned everything. Epoxy primer, then paint - 3 coats primer and 4 coats paint. I used high quality rattle can paint (Duplicolor high temp) but would have rather used something better I just didn't have better paint on hand or feel like ordering it. This should last 10yrs or so, I prep'ed it right so it went on nicely.
I am glad you like the pictures. The point of posting this stuff is to help other people. This is the first time I have rebuilt a portal axle and the first time I have rebuilt a Pinz axle. I am not special, if I can do it anybody can!
axle parts being cleaned
the drift/tool I made for driving in the wheel bearings. I used both press and mallet to drive in bearings, either works. I think it is important to drive the bearings in correctly, otherwise you can damage the bearings or worse. Two inch pipe with a piece of plate cut out with the plasma cutter, welded to the pipe and then cleaned up with a flap disc on the grinder.
a big piece of pipe will work too if you don't fancy making tools.
Rebuild in full effect, I got to say for 1975 (year of my truck) this gear is highly engineered and before it's time. I am a Nissan and Toyota guy and back in the 70's, all their stuff was coarse spline with way fewer bearings, c-clips, ect. The Pinz stuff is made strong and made very well and I feel it shows.
It is nice when you make a tool and find other uses for it
the order that this stuff goes on the axle shaft. note: bearing goes into housing first, collar is driven on the shaft then shaft inserted from the back of the housing, then the washer/spacer then the gear is pushed on the shaft followed by the outer collar with the washer and bolts going on last.
bearing collars on the shafts, I used my drift plus a BF rubber mallet. Put the axle shaft on a piece of wood (to not damaged it) and beat the collar on it. I did the same for the last collar for the outer bearing that sits in the housing and is under the washer/tab and bolts. This was pounded on once all this was in the housing in the same way that this collar was beat on.
housing before cleaning
driving the bearings into the housing, these were the ones that were a real pita to remove (plus the small needle bearing in the alloy backing plate) simply because I didn't feel comfortable using a puller on them that may mar or damage the housing. So I used a slide hammer (with 3-jaw puller) which destroyed the old bearings getting them out. It worked though...
bearings in and mating surfaces cleaned, I use a 3M scotch bright on my die grinder to clean mating surfaces plus healthy does of brake cleaner. Be careful if using a scotch bright in this fashion, it can take down the steel and leave you with a not so even mating surface. The key is not much throttle! Brake cleaner eats paint by the way!
just about rebuilt
rebuilt!!
getting ready to mate the housing & backing plate
mated!!
ready to install
It took me two full days to do the wheel drives. One day to prep it all (clean, sand blast, paint) and one day to assemble. I took my time, drinking beer, letting paint cure, making tools, cleaning all parts, dry fitting, ect. Amazing how simple it really all is. A Pinz can be intimidating to work on but I have found they are really pretty easy to do things like this to. It is a bit foreign to what I am used to but really not to big of a deal. I did find it odd how the wheel bearings the pre-load is pre-set. Every vehicle I have ever worked on this is not the case but I suppose Steyr made the Pinz this way on purpose. I had got a wild hair up my arse and thought I would drill the bolts on the axle shafts and main gear and then safety wire them down. Drill bits were to small for the drill press and when I tried to do them by hand realized it was a fools idea. 30-minutes of drilling got me nearly nowhere! So I just locktighted the hell out of the bolts and called it good. If I did it again, I would just order the upgraded bolts and washers for the job. I plan to inform the new owner of all this in a few weeks when I turn the truck over to him. I will also advise him to keep a close eye on the rear axle for a few hundred miles.
It would have been nice to replace all the hardware, ie nuts, bolts & washers. Even have a few items plated with zinc. That would have really made things look good. But that is a full on nut & bolt restoration which I am not doing. I just call this a re-furbish rather than a resto. You got to pick your battles and then fight them.
BTW, I got the diff in under the truck tonight and all mounted. That was a big deal, next up is get the wheel drives back on!
I am looking forward to driving this truck soon!
Mistakes I made so far;
-not removing the front drive flange which hid a small locking allen screw. This got me for separating the housing.
-trashed c-clips (small ones) when removing them from witches hat. Not a big deal but had to find new ones that matched since new ones no longer available from Steyr.
-thinking I lost 4 washers for the cheese head bolts that hold the diff halves together. I forgot the brake line tabs/mounts are used as washers! This meant I had to pull the bolts a 2nd time and move the washers to the right locations.
-destroyed a pin for the e-brake levers thinking I had a replacement. Turns out it was the only one NLA! Had I been more careful I think I could have got it out without trashing it.
-should have cleaned the top diff half when I had it out. The bottom is easy to clean while the whole diff is in the truck, top not so much.
-axle shaft gets tapped into the housing to remove. We messed with this a while, by the parts exploded diagrams it sure looked like it went out. The book says nothing other than tap it out. A real duh moment!
-ordered new steel brake lines and related hardware. Mine are old and ugly and corroded. replacing them would have been best during this rebuild.
That is about it....
Cheers

Re: The Warn Pinzgauer
Those ARE some big dunes!!! 
Sent from my Nexus 4 using Tapatalk
Sent from my Nexus 4 using Tapatalk
Ottawa, Canada
1974 710M
2007 2WD Ural Patrol
1974 710M
2007 2WD Ural Patrol